Monday, November 28, 2005

Unit Test Guidelines

Tests live under many names. And, many tests masquerade as unit tests.

Unit testing is defined as:
... a procedure used to verify that a particular module of source code is working properly. The idea about unit tests is to write test cases for all functions and methods so that whenever a change causes a regression, it can be quickly identified and fixed. Ideally, each test case is separate from the others ... [Wikipedia]

There are existing practices that I consider to be good guidelines concerning unit testing.

  • William Caputo - Do Not Cross Boundaries. The central idea is to decouple the code from the resources. An added benefit is the reduced running time of the tests. The faster the tests are, the more often they are run.
  • Dave Astels - One Assertion Per Test. While the idea is controversial it's also very thought provoking. If you follow this rule your tests become simple, expressive, and elegant. I don't follow this rule 100% of the time; however, I do believe it's a great guideline.

I follow another guideline that I haven't seen documented anywhere.
Only one concrete class (with behavior) should be used per test.
The central reason for testing concrete classes individually is to promote durable tests. When several concrete classes are used in one test the test becomes brittle. Making a change to any of the coupled concrete classes can cause cascading test failures.

Both mocks and stubs can be used in place of concrete classes where necessary while testing an individual class. If you find your hierarchy too complicated to use mocks or stubs this is probably a sign that you need a simpler and less coupled hierarchy. Using Object Mother is a common alternative to refactoring to a better hierarchy. If you find yourself reaching for Object Mother, take the time to refactor instead.

Sunday, November 27, 2005

What's in your build?

A basic build generally consists of clean, compile, and test. However, you can (and should) add more or tweak the build to make life easier and increase the quality of the code you produce. Most people _hate_ working on the build. Build languages are usually painful to work with and optimizing the build isn't very exciting. However, you should be running the build several times a day so each optimization can save you a lot of time over the life of the project.

  • Separate Tests - Create unit tests that test specific responsibilities of individual classes. Create functional tests that test classes working together to achieve a larger goal.
  • Database Generation - Use database scripts to generate the database during the build. Optimize the process by only dropping and adding tables, views, etc when the script(s) change. However, clear and reload the sample data on each build to ensure functional tests are hitting consistent data each build.
  • Simian - Use Simian to ensure that duplicate code is not slipping into your code base.
  • Code Coverage - I admit it, Code Coverage can be misleading. However, managers and business sponsors love charts with reassuring numbers. Additionally, if the team pays little attention to the code coverage number an interesting thing happens. No one attempts to trick the code coverage numbers and they become useful. When the numbers dip below tolerance the tech lead can use the warning to suggest to the team that more focus be given to testing. Note: The tech lead should never mention that the code coverage tool tipped him off or the team may start writing worthless tests that satisfy the code coverage tool, thus rendering it useless.
    For .net use NCover (the version that fits your needs) or Clover.net, for Java I believe Clover is the most popular
  • Modification Compilation - Use a build language that can detect modification dates. Components of your application only need to be recompiled when changes are made to the source files.

There are other tools such as CheckStyle and FXCop that are supposed to be helpful. In theory they sound great; however, I've never used either so I didn't include either. Please let me know if you have any suggestions or optimizations I've missed.

Friday, November 18, 2005

Adding NanoContainer

After you have already decided to Add PicoContainer you can go a step further and use NanoContainer. NanoContainer is a complement to the PicoContainer project, providing it with additional functionality. One aspect of NanoContainer is the ability to mark your classes with an attribute that PicoContainer can use to register components.

Using NanoContainer attributes is very easy. Each of my classes need to be registered with default options (Constructor Injection, Caching); therefore, all I need to do is add the [RegisterWithContainer] attribute to each class. I add this attribute to all the classes I want registered; however, I'll only show PresenterFactory.
[RegisterWithContainer]
public class PresenterFactory
{
public Hashtable presenterHash = new Hashtable();

public PresenterFactory(IPresenter[] presenters)
{
for (int i = 0; i < presenters.Length; i++)
{
this.presenterHash[presenters[i].View.GetType()] = presenters[i];
}
}

public IView Find(Type type)
{
IPresenter presenter = (IPresenter) presenterHash[type];
presenter.Push();
return presenter.View;
}
}

After adding the [RegisterWithComponent] attribute I change the EntryPoint class implementation to use the AttributeBasedContainerBuilderFacade. The BuilderFacade will create a new instance of IMutablePicoContainer that I can use to register my UserData instance. I can also continue to use the container to get an instance of the MainPresenter.
public class EntryPoint
{
[STAThread]
static void Main()
{
ContainerBuilderFacade containerBuilderFacade = new AttributeBasedContainerBuilderFacade();
IMutablePicoContainer container = containerBuilderFacade.Build(new string[] {"SampleSmartClient.UI.dll"});
container.RegisterComponentInstance(createUser());
MainPresenter presenter = (MainPresenter) container.GetComponentInstance(typeof(MainPresenter));
Application.Run(presenter.MainForm);
}

private static UserData createUser()
{
UserData user = new UserData();
user.Name = "John Doe";
user.JobTitle = "Rockstar";
user.PhoneNumber = "212-555-1212";
user.Password = "password";
return user;
}
}


As I previously noted, using NanoContainer Attributes does add a dependency to NanoContainer. Some people are very against this idea. Personally, it seems like another case of concern over less dependency for less dependencies sake. Adding a dependency to NanoContainer should cause you no pain, but it will clean up your code. The achieved clarity in code is worth the added dependency.

Adding PicoContainer

I recently blogged about Rich Client Development in a 4 part series that led to a small reference implementation. It is immature, but it's in perfect condition to demonstrate the value of PicoContainer.

The current implementation of the EntryPoint class looks like this:
public class EntryPoint
{
[STAThread]
static void Main()
{
MainForm mainForm = new MainForm();
UserData userData = createUser();
new MainPresenter(mainForm, createPresenterFactory(userData));
Application.Run(mainForm);
}

private static UserData createUser()
{
UserData user = new UserData();
user.Name = "John Doe";
user.JobTitle = "Rockstar";
user.PhoneNumber = "212-555-1212";
user.Password = "password";
return user;
}

private static PresenterFactory createPresenterFactory(UserData user)
{
return new PresenterFactory(getPresenters(user));
}

private static IPresenter[] getPresenters(UserData user)
{
return new IPresenter[] { getReadPresenter(user), getUpdatePresenter(user) };
}

private static IPresenter getReadPresenter(UserData user)
{
ReadView view = new ReadView();
return new ReadPresenter(view, user);
}

private static IPresenter getUpdatePresenter(UserData user)
{
UpdateView view = new UpdateView();
return new UpdatePresenter(view, user);
}
}

While this is clean, it's a bit more verbose than necessary. A simpler solution is to register each type with PicoContainer and allow Pico to resolve the dependencies. The only exception is that I would like to populate a UserData instance that will be used as a constructor argument to many other classes. Pico allows me to do this using RegisterComponentInstance. Converting my EntryPoint class to take advantage of PicoContainer causes the implementation to look like this:
public class EntryPoint
{
[STAThread]
static void Main()
{
DefaultPicoContainer container = new DefaultPicoContainer();
container.RegisterComponentInstance(createUser());
container.RegisterComponentImplementation(typeof(PresenterFactory));
container.RegisterComponentImplementation(typeof(MainPresenter));
container.RegisterComponentImplementation(typeof(MainForm));
container.RegisterComponentImplementation(typeof(ReadPresenter));
container.RegisterComponentImplementation(typeof(ReadView));
container.RegisterComponentImplementation(typeof(UpdatePresenter));
container.RegisterComponentImplementation(typeof(UpdateView));
MainPresenter presenter = (MainPresenter) container.GetComponentInstance(typeof(MainPresenter));
Application.Run(presenter.MainForm);
}

private static UserData createUser()
{
UserData user = new UserData();
user.Name = "John Doe";
user.JobTitle = "Rockstar";
user.PhoneNumber = "212-555-1212";
user.Password = "password";
return user;
}
}

This implementation is shorter and arguably easier to understand. Notice PicoContainer creates instance of the dependent objects I need including an array of IPresenters that are used as a constructor argument to the PresenterFactory. If you design your class as Good Citizens and prefer Constructor Injection, adding PicoContainer should be easy and very worthwhile.

MVP and Dialog

I recently received a request to show how Model View Presenter and a modal dialog could work together. I'm going to use the existing rich* client example I've been working with lately. For demonstration purposes we will assume that the UserData class has a password property that contains a user's password. When a user updates their information they will be prompted to enter their password. Successful authentication updates their information and navigates the user to the read only view. Unsuccessful authentication does nothing, but clicking "Cancel" will close the dialog without saving info and without navigating away from the update view.

The modification is to add a password to the existing UserData instance.
public class EntryPoint
{
private static UserData createUser()
{
UserData user = new UserData();
user.Name = "John Doe";
user.JobTitle = "Rockstar";
user.PhoneNumber = "212-555-1212";
user.Password = "password";
return user;
}

...
}

The only change to the UpdateView is to remove the NavigationDispatcher.RaiseNavigate method call from the saveButton click handler. We'll now handle navigation in the presenter (perhaps we should have moved it when we introduced the NavigationDispatcher anyway).

The SaveUserDialog is a Windows Form that allows a user to enter a password and save, or cancel and do not save.

SaveUserDialog exposes it's PasswordTextBox as a public field. When a user clicks the "Save" button SaveUserDialog raises the RequestAuthorization event. Clicking "Cancel" just closes the form.
public class SaveUserDialog : Form
{
private Label label1;
public TextBox PasswordTextBox;
private Button saveButton;
private Button cancelButton;
public event UserAction RequestAuthorization;
private Container components = null;

public SaveUserDialog()
{
InitializeComponent();
}

... deleted generated code...

private void saveButton_Click(object sender, EventArgs e)
{
RequestAuthorization();
}

private void cancelButton_Click(object sender, System.EventArgs e)
{
this.Close();
}
}

The presenter for the SaveUserDialog has the responsibility of verifying the password matches and then setting the dialog.DialogResult = DialogResult.Yes.
public class SaveUserPresenter
{
private readonly SaveUserDialog dialog;
private readonly string password;

public SaveUserPresenter(SaveUserDialog dialog, string password)
{
this.dialog = dialog;
this.password = password;
dialog.RequestAuthorization+=new UserAction(AuthorizeSave);
}

private void AuthorizeSave()
{
if (dialog.PasswordTextBox.Text==password)
{
dialog.DialogResult=DialogResult.Yes;
dialog.Close();
}
}
}

I considered passing the entire UserData object to the SaveUserPresenter; however, it seemed easier to keep this presenter as thin as possible and keep the save functionality in the UpdatePresenter. If more functionality were required I wouldn't hesitate to pass in more objects and give more responsibility to the SaveUserPresenter.

All of these changes and additions come together in the UpdatePresenter. The UpdatePresenter is now responsible for creating and showing the SaveUserDialog. Additionally, the UserData instance should only be updated if the SaveUserDialog returns DialogResult.Yes. Lastly, the UpdatePresenter is also responsible for calling NavigationDispatcher.RaiseNavigate if DialogResult.Yes is set.
public class UpdatePresenter : IPresenter
{
private readonly UpdateView view;
private readonly UserData user;

public UpdatePresenter(UpdateView view, UserData user)
{
this.view = view;
this.user = user;
view.Save+=new UserAction(updateUser);
Push();
}

public IView View
{
get { return view; }
}

public void Push()
{
view.NameTextBox.Text = user.Name;
view.JobTextBox.Text = user.JobTitle;
view.PhoneTextBox.Text = user.PhoneNumber;
}

private void updateUser()
{
SaveUserDialog dialog = new SaveUserDialog();
new SaveUserPresenter(dialog, user.Password);
if (dialog.ShowDialog()==DialogResult.Yes)
{
user.Name = view.NameTextBox.Text;
user.JobTitle = view.JobTextBox.Text;
user.PhoneNumber = view.PhoneTextBox.Text;
NavigationDispatcher.RaiseNavigate(typeof(ReadView));
}
}
}

If my application contained several modal dialogs I would also look at possibly moving the creation into a factory similar to the PresenterFactory. Each presenter could take the DialogFactory as a constructor argument allowing for easy access.

For testing purposes I would create a IDialog interface that contained the DialogResult property. Each Dialog would obviously implement the IDialog interface and the dialog presenters would take an IDialog as a constructor argument instead of the concrete class. This would allow me to easily mock the dialog when testing the SaveUserPresenter.

* thanks to Matt Deiters for pointing out that, contrary to popular belief, smart and rich are different. (luckily, Matt is both)

Wednesday, November 16, 2005

Smart Client Development Part IV

In Part III I completed the UpdatePresenter and had a working demo application. Unfortunately, you may have noticed that in MainPresenter the Navigate of each view is subscribed to each time it is returned from the PresenterFactory. This causes the MainPresenter to reload the View as many times as it has been returned from the PresenterFactory. To solve this issue you can add another class called NavigationDispatcher.
public class NavigationDispatcher
{
public static void RaiseNavigate(Type type)
{
Navigate(type);
}

public static event NavigateHandler Navigate;
}

NavigationDispatcher allows you to raise the Navigate event from both the MainForm and the UpdateView. The UpdateView button click event changes to:
private void saveButton_Click(object sender, EventArgs e)
{
Save();
NavigationDispatcher.RaiseNavigate(typeof(ReadView));
}

The only other change to make is in MainPresenter.
public class MainPresenter
{
private readonly MainForm form;
private PresenterFactory presenterFactory;

public MainPresenter(MainForm form, PresenterFactory presenterFactory)
{
this.form = form;
NavigationDispatcher.Navigate+=new NavigateHandler(Navigate);
this.presenterFactory = presenterFactory;
}

private void Navigate(System.Type viewType)
{
form.ContentPanel.Controls.Clear();
IView view = presenterFactory.Find(viewType);
form.ContentPanel.Controls.Add((Control) view);
}
}

Subscription to the NavigationDispatcher's Navigate event occurs in the constructor; however, the subscription is no longer necessary in the Navigate event (where we used to subscribe to the Navigate event of the View). Obviously, the Navigate event can be removed from the IView at this point also.

Smart Client Development Part III

In Part II I added presenter functionality to the ReadView User Control. Next I'll add a Presenter for the UpdateView

Adding the UpdatePresenter actually led to a decent refactoring. After adding UpdatePresenter I realized that I needed the ability to push changes in the UserData instance to the ReadView.

This meant changing the ViewFactory to a PresenterFactory. This change was required because the Presenter handles pushing changes to the view. Therefore, I needed to maintain a reference to the presenter and call Push before displaying a view. The refactored ViewFactory becomes this PresenterFactory.
public class PresenterFactory
{
public Hashtable presenterHash = new Hashtable();

public PresenterFactory(IPresenter[] presenters)
{
for (int i = 0; i < presenters.Length; i++)
{
this.presenterHash[presenters[i].View.GetType()] = presenters[i];
}
}

public IView Find(Type type)
{
IPresenter presenter = (IPresenter) presenterHash[type];
presenter.Push();
return presenter.View;
}
}

This lead to changing the EntryPoint to add IPresenters to the PresenterFactory.
public class EntryPoint
{
[STAThread]
static void Main()
{
MainForm mainForm = new MainForm();
UserData userData = createUser();
new MainPresenter(mainForm, createPresenterFactory(userData));
Application.Run(mainForm);
}

private static UserData createUser()
{
UserData user = new UserData();
user.Name = "John Doe";
user.JobTitle = "Rockstar";
user.PhoneNumber = "212-555-1212";
return user;
}

private static PresenterFactory createPresenterFactory(UserData user)
{
return new PresenterFactory(getPresenters(user));
}

private static IPresenter[] getPresenters(UserData user)
{
return new IPresenter[] { getReadPresenter(user), getUpdatePresenter(user) };
}

private static IPresenter getReadPresenter(UserData user)
{
ReadView view = new ReadView();
return new ReadPresenter(view, user);
}

private static IPresenter getUpdatePresenter(UserData user)
{
UpdateView view = new UpdateView();
return new UpdatePresenter(view, user);
}
}

The IPresenter interface is used to get access to the View and to Push the model changes to the View before it is displayed.
public interface IPresenter
{
IView View { get; }
void Push();
}

After these changes you can add the UpdatePresenter.
public class UpdatePresenter : IPresenter
{
...

private void saveButton_Click(object sender, System.EventArgs e)
{
Save();
Navigate(typeof(ReadView));
}
}

The end result is an update view that saves changes....

when you click "Save."

Smart Client Development Part II

In Part I I described the basic set up for creating a smart client application. The next step is to add some data to the UserData object created in the EntryPoint and then display this data in the ReadView User Control.

EntryPoint should be updated by adding some values to UserData and passing the user object to ReadView's presenter.
public class EntryPoint
{
[STAThread]
static void Main()
{
MainForm mainForm = new MainForm();
UserData userData = createUser();
new MainPresenter(mainForm, userData, createViewFactory(userData));
Application.Run(mainForm);
}

private static UserData createUser()
{
UserData user = new UserData();
user.Name = "John Doe";
user.JobTitle = "Rockstar";
user.PhoneNumber = "212-555-1212";
return user;
}

private static ViewFactory createViewFactory(UserData user)
{
return new ViewFactory(getViews(user));
}

private static UserControl[] getViews(UserData user)
{
return new UserControl[] { getReadView(user), getUpdateView(user) };
}

private static UserControl getReadView(UserData user)
{
ReadView view = new ReadView();
new ReadPresenter(view, user);
return view;
}

private static UserControl getUpdateView(UserData user)
{
return new UpdateView();
}
}

ReadView's presenter handles the logic that puts the correct data in the ReadView.
public class ReadPresenter
{
private readonly ReadView view;
private readonly UserData user;

public ReadPresenter(ReadView view, UserData user)
{
this.view = view;
this.user = user;
push();
}

private void push()
{
view.NameLabel.Text = user.Name;
view.JobLabel.Text = user.JobTitle;
view.PhoneLabel.Text = user.PhoneNumber;
}
}

The only other changes that need to be made are making the NameLabel, JobLabel, and PhoneLabel public on the view.
The result is a dumb view and all the behavior is in the Presenter. The view should look similar to this and be working at this point if you click on "View."


In Part III I'll create the presenter for the UpdateView.

Smart Client Development Part I

A friend recently requested that I document how I've recently been doing smart client development. I decided to put together a small application to show the basics.

The first step to creating a smart client application is setting up the solution. The UI will need to be separated into a Class Library project and a Windows Applicaiton project. The Windows Application project will usually contain only the entry point to the application. All other UI components will live in the Class Library.

Testability is the reason we separate the UI components into their own library. It's possible to be tricky and combine the projects; however, separating this way is easy and allows us to test the UI components without any additional steps.


The EntryPoint class has the responsibility of creating an instance of the MainPresenter and the MainForm. (I'm also going to pass in a UserData instance and a ViewFactory instance to the MainPresenter's constructor. Perhaps in the future I'll document how I'd likely handle this using PicoContainer for a real system.)
public class EntryPoint
{
[STAThread]
static void Main()
{
MainForm mainForm = new MainForm();
UserData userData = new UserData();
new MainPresenter(mainForm, userData, createViewFactory());
Application.Run(mainForm);
}

private static ViewFactory createViewFactory()
{
return new ViewFactory(getViews());
}

private static UserControl[] getViews()
{
return new UserControl[] { getReadView(), getUpdateView() };
}

private static UserControl getReadView()
{
return new ReadView();
}

private static UserControl getUpdateView()
{
return new UpdateView();
}
}
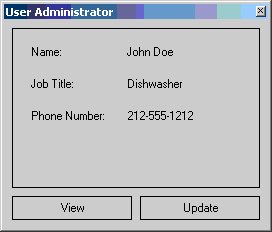
The MainForm contains a button for viewing user details, a button for
editing user details, and a panel where the user controls will be added
in response to user actions.

Next we'll add the views and handle navigating between them. For now I'll use view place holders that have a label that says "Read" or "Update" depending on which view is being displayed. The ReadView also navigates to the UpdateView when the label is clicked. This allows us to verify that the navigation is wired and working. The User Controls are normal User Controls that implement the IView interface allowing them to be used for navigation.
public class ReadView : UserControl, IView
{
private Label label1;
private Container components = null;
public event NavigateHandler Navigate;

public ReadView()
{
InitializeComponent();
}

protected override void Dispose( bool disposing )
{
if( disposing )
{
if(components != null)
{
components.Dispose();
}
}
base.Dispose( disposing );
}

... snipped generated code ...

private void label1_Click(object sender, System.EventArgs e)
{
Navigate(typeof(UpdateView));
}
}


The IView interface only contains the Navigate event used for specifying which User Control to navigate to.
public interface IView
{
event NavigateHandler Navigate;
}

The NavigationHandler specifies a parameter of Type allowing you to specify which view to navigate to.
public delegate void NavigateHandler(Type viewType);

The ViewFactory holds each View in a Hashtable and returns them based on the type requested.
public class ViewFactory
{
public Hashtable viewHash = new Hashtable();

public ViewFactory(UserControl[] views)
{
for (int i = 0; i < views.Length; i++)
{
this.viewHash[views[i].GetType()] = views[i];
}
}

public IView Find(Type type)
{
return (IView) viewHash[type];
}
}

The MainForm also implements IView. Implementing IView allows MainForm to raise Navigation events. The user triggers this navigate by clicking one of the buttons. The button click event then raises Navigate with the appropriate view specified.
public class MainForm
{
...

private void viewButton_Click(object sender, EventArgs e)
{
Navigate(typeof(ReadView));
}
}

The MainFormPresenter ties everything together by subscribing to the Navigate events of both the MainForm and each View. When the Navigate event is raised the Presenter requests a view from the ViewFactory.
public class MainPresenter
{
private readonly MainForm form;
private readonly UserData user;
private ViewFactory viewFactory;

public MainPresenter(MainForm form, UserData user, ViewFactory viewFactory)
{
this.form = form;
form.Navigate+=new NavigateHandler(Navigate);
this.user = user;
this.viewFactory = viewFactory;
}

private void Navigate(System.Type viewType)
{
form.ContentPanel.Controls.Clear();
IView view = viewFactory.Find(viewType);
view.Navigate+=new NavigateHandler(Navigate);
form.ContentPanel.Controls.Add((Control) view);
}
}

This example is simple, but will be the basis for showing how to implement a easily testable and well separated UI layer.

Tuesday, November 15, 2005

C# Public Readonly Fields

C# public readonly fields are great. Why waste your time writing this:
public string foo;
public string Foo
{
get { return foo; }
}
When this:
public readonly string Foo;
gives you the same level of protection?

I know people simply hate public fields. The problem is this hatred has become blind hatred. A public field is dismissed without thought. In reality a private field and a getter gains me little over a public readonly field. You could argue that making a field readonly ensures it contains the value expected and is better than simply a private field with a getter.

Because I actively seek Good Citizens and Constructor Injection the field being writable only in a constructor or on the same line as the declaration is rarely a problem.

I prefer less code over blindly following a rule that simply doesn't apply to readonly fields.

Tuesday, November 08, 2005

Logging == Crutch

When developing using BDUF log files are often used to determine expected input and output. The log file is a valuable tool that can be used to determine the source of bugs and problems.

However, once you step into the world of Test Driven Development you should leave the log file in the past. Instead of depending on a log file, the test suite should test for boundry cases that would appear in a log file.

BDUF is walking (or crawling), but Agile development is running. When you want to run, leave the crutch behind.

Saturday, November 05, 2005

Attribute usage

Attributes in .net are controversial. NUnit's attribute usage has been praised. Conversely, the NanoContainer implementation has been criticized*. So what is the difference? What makes one usage successful and another a failure?

In an email exchange, Martin Fowler expressed to me (roughly, I didn't save the email, so I can't quote) that a major problem with using attributes is that they can cause coupling issues. For example, adding the NanoContainer attribute will add a dependency to NanoContainer within your project. Compared this to the NUnit implementation, NanoContainer is much more intrusive. The NUnit attributes are used on the test classes (and test methods). This requires no change to your existing classes and adds no dependency on NUnit within your existing classes.

Attributes are often used as class markers, which can also be done by implementing an interface. However, if you need to mark a method or property an attribute is a great candidate. I think this is another reason that NUnit was so successful concerning attributes. Conceptually, without attributes a class could implement a ITest, but which methods would be run as test methods?

So, when would you use attributes in your code? Currently, I'm working on a project where we have an object that represents several database tables. Additionally, these tables contain data that needs to be transformed. The transformation rules are contained in a database that the business analysts maintain. The business analysts are intimately familiar with the database tables and columns. Therefore, the transformation rules are written using the database table and column names as identifiers.

Unfortunately, the table.column identifier is not very descriptive. For readability we chose to create readable properties on the object and simply add a attribute that contains the table.column identifier. The transformation engine can load the rules from the database, use reflection to find the corresponding property, and transform the value.

public class Foo
{
[Identifier("AMfD.b12F")]
public string Bar
{
get { return bar; }
}
}

With this implementation, the value of the property can be easily accessed using reflection and the identifier or simply by accessing foo.Bar. Conceptually, this could be done with some mapping code also, but this seemed to be the simplest thing that could possibly work.

* Personally, I like the attribute usage in NanoContainer also.